Here at simply stylish I will show you the coolest looks of the season and give you how to's to update or renew your look. I also will be doing 365 hair styles for 365 days. It's a challenge, who will try my looks with me? I will also give tutorials every now and again on different hairstyles and looks that are popular for the season. I hope to inspire and change the lives of many people... Even if it's on a small scale.
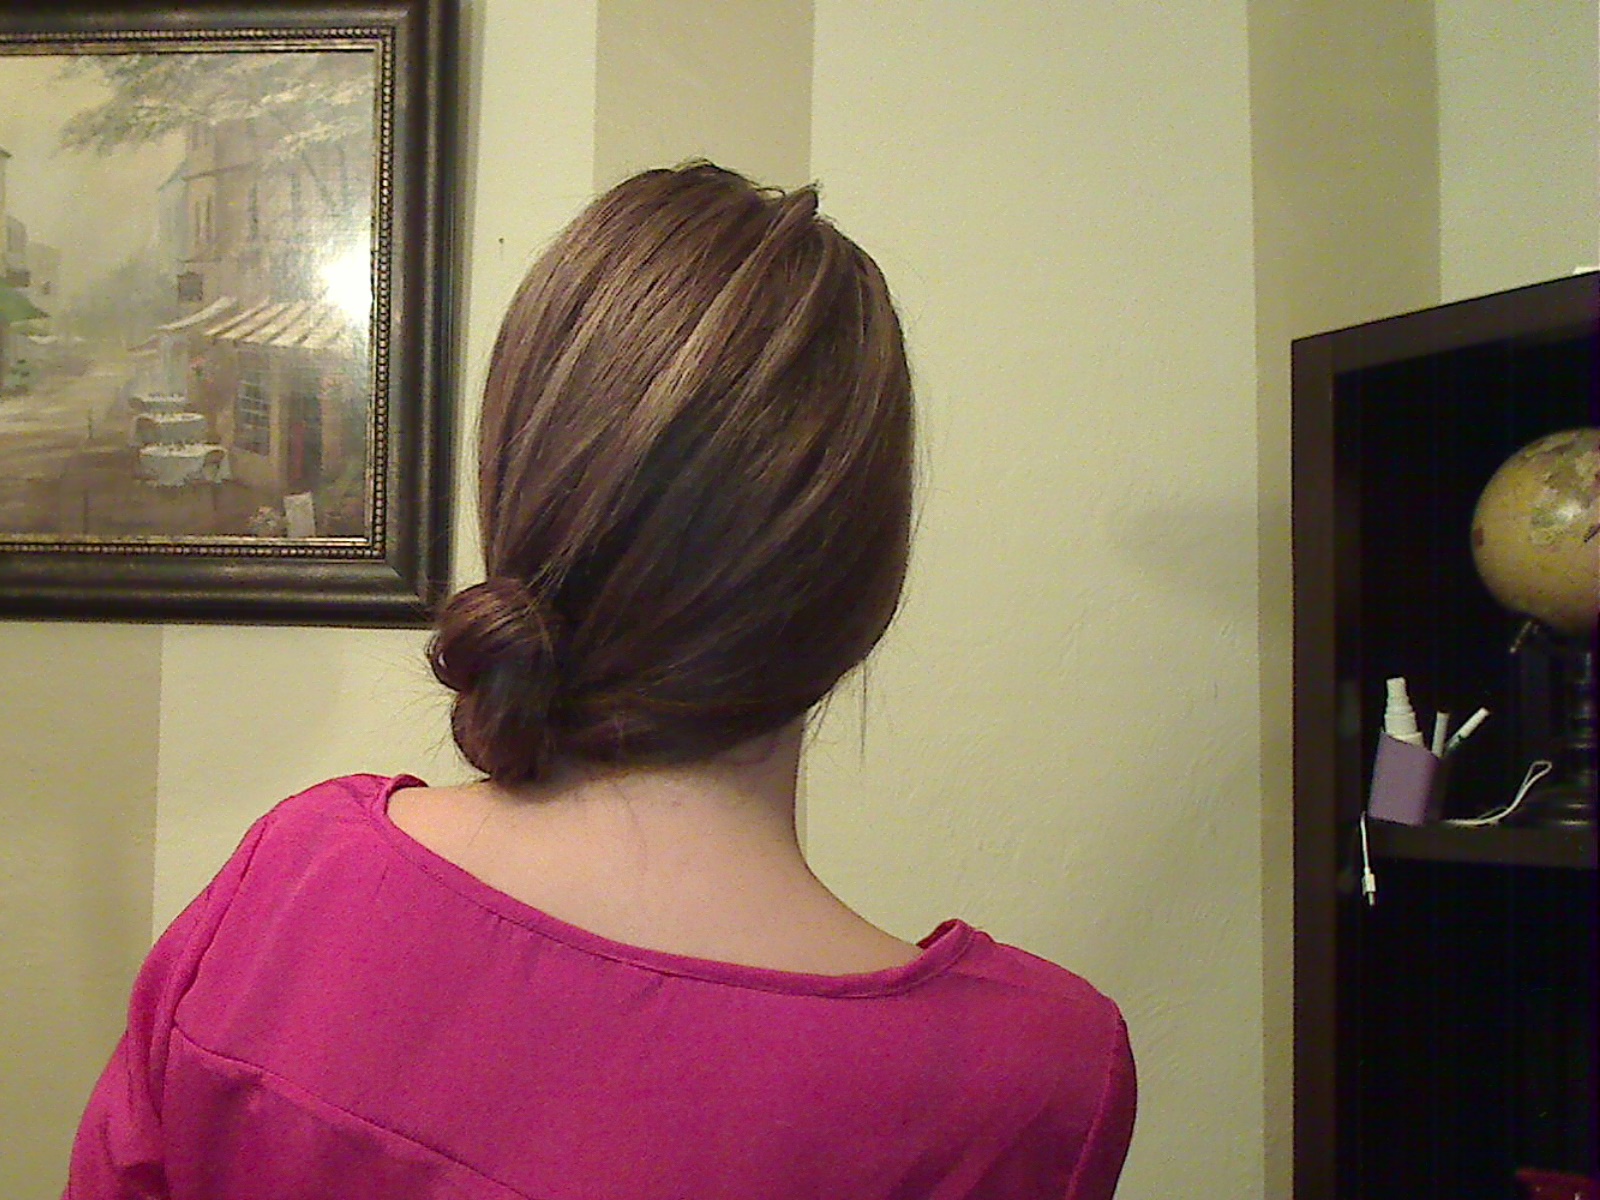
Hairstyle # 40
The Pretty Bun
For this look you will need: Bobby pins, hairspray, your smallest curling iron, and a hair tie
Level of difficulty **
I was inspired to do this look from a hairstyle that Lauren Conrad wore to an event last year. It is so cute and a bit romantic I think. I left some peices out around my face and you can choose not to do so. Have fun with this look and please enjoy the tutorial below!! Thanks for visiting Simply Stylish!
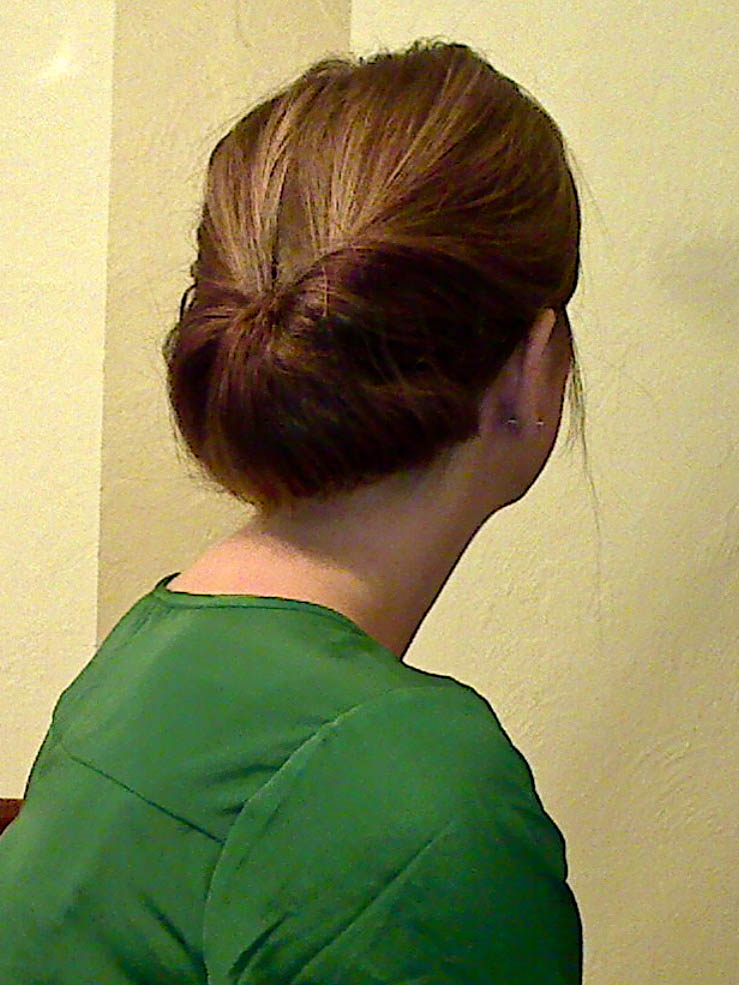
Hairstyle # 39
The Braided Pony Tail~
For this look you will need: Two elastic hair bands, a hair tie, hairspray, comb, and flat iron
Level of difficulty: *
I love to do this style for when I am in a huge hurry and I still want my hair to be somewhat decent. I am going to a softball game today with the kids to watch Jake play and wanted a cute but fast hairstyle. Thus, the braided pony tail.
To begin this style make sure your hair is straight. Mine was NOT because I slept in a pony tail so I ran the flat iron through mine before I began my braids.
After you have gotten it somewhat straight take 1 to 2 inch sections at the top of each ear and seperate those from the rest of you hair. Begin braided each section. When you have put the braid in, secure it with an elastic hair band. Repeat this step on the opposite side.
Once your braids have been created grab the rest of your hair as if you are about to put it up into a pony tail, before you secure it pick up one braid and add it to the pony tail and remove the elastic hair band and then repeat on the opposite side. Once both braids have been added to the pony tail secure in place with a hair tie. Spray this style in place.
Thats it! Viola!! I hope you guy love this look and it rescues you when you are in need!! Have a great weekend!
You will Need: A comb, an elastic hair band, and your hairspray.
Level of difficulty: *
This Style is for medium to long hair.
This style is super simple and of course, simply stylish. It is a different take on the side pony tail. A little extra added "flair" if you will.
Put your hair to one side, the side you want your pony tail to be on and then divide that hair into two sections. Once you have your two sections tie them together as if you were tying your shoe laces. You can do this one to three times depending on how long your hair is. I got two ties in mine. Once your ties are in secure your look with an elastic hair band. Spray in place with redken 23 "Forceful" or something similar. I hope you guys love this hairstyle. It is very very versatile.
I fell upon this hairstyle by mistake. I was doing the "Heidi klum" and realized that this would be a cute style also and perfect for "Low maintenance Monday."
To Start you will Need: A comb, and teasing brush, bobby pins , and your hairspray. Also, if you would like some movement to your hair you can use a curling iron. I chose to use a 3" barrel curling iron.
The trick to this style is the "tuck" technique I use to create the look. Take your section of hair that you want to put up and kind of twirl the ends and tuck them upward underneath the hair. That will create this swirl look. I hope you all enjoy this hairstyle. It super easy and as always, simply stylish!
I saw this picture of Heidi Klum at an awards ceremony and decided to give it a whirl. I hope you guys enjoy this tutorial on how to achieve Heidi's look.
For this look you will need:
A comb, hairspray,bobby pins and a curling iron
The front section of your hair will be put into a twist and the rest of your hair will be put up in the back. Have fun with style and remember....keep trying if you don't get it the first time! Practice practice practice!!!
Please Enjoy this tutorial!!! Please let me know what you think! All comments are welcome!
You Will Need: A hair tie, a comb, a teasing brush/comb, hair spray and a headband for a little extra flair if you want some!
So, this look is derived from a Jessica Alba photo of her at something of some importance and she has her hair in the most elegant pony tail. It inspired me and I wanted to try it! I hope you enjoy it!
I curled my hair all in one direction to start so that the pony tail curls come together to make one giant pony tail curl. After I curled my hair I then teased it....a lot. After I have it teased I put it in a pony tail. Make sure your pony sits in the right spot on your head. I chose to put mine a little bit above my ears. Twist your pony tail together and spray it! Make sure the last thing to run through your hair is your fingers...this is a natural swept look, not a sleek combed look! If you want to you can add a headband. I did and it was sort of last minute but I liked the way it looks. The headband is totally optional! Thanks for visiting and I hope you enjoy this look and tutorial!
You will need: Shine Spray, your flat iron, your hairspray and extensions. 14" wefts.
I use Remy Hair Extensions from sally's. I used two single wefts to create this look.
I first curled my hair with my flat iron on just the ends and just a few through the top. I then made a part on the left side of my head and inserted my 14" Remy Hair Extension and braided it and pined it to the other side of my head. I repeated this on the right side of my head.
To complete my look I sprayed my hair with Redken Shine Spray and ran some Redken Outshine through my curls to eliminate any frizz. This look is fun and super easy.
Stay tuned ladies..... I am entering into "Extension" territory and will be doing lots of fun creative looks with my hair extensions!! For now however, I chose to keep things Simply Stylish!
You will need: A headband, Redken 23 Hairspray, bobby pins if your hair is shorter in length, and a curling iron if you want to add some movement to the hair.
To Begin:
To start off this style I lightly curled the ends of my hair with my "hot tools" brand 1 1/2 inch curling iron. I then placed my headband on the top of all my hair and tucked it all into the headband. Is that it? YES, that was all I did. Please check out my tutorial below to see exactly how I achieved this simply stylish look! ENJOY!!!
You will need a double strand headband, bobby pins, rat tail comb and hairspray. Also, you will need your smaller curling iron or if you have naturally curly hair where it naturally curly and save yourself the time of having to curl your hair.
I was looking online for hairstyles and I came across this one that reminded me of a medieval time. I liked it so much that I decided to try it. I used the technique where I twist a section and and hold a tiny strand at the bottom and scrunch it up!!! This hairstyle is pretty easy. It is cute for a dance, or anything formal. You may even like it well enough to wear to work. Please enjoy the tutorial below! Thanks for visiting Simply Stylish!
You will need a hair tie, a teasing comb, and a rat tail comb for this style.
I am sure you ladies all remember the topsy tail? I remember when my dad took me to buy one. I thought it was the greatest thing in the world. Unbenounced to me, you can achieve the topsy tail style withouth the little contraption. This is what I am showing you today. How to do a modern take on the topsy tail.
I was asked to do a low pony tail style and so here it is. This look is great wherever. Work, the playground with your kids, PTA meeting, bake sales, pot lucks, night out with friends, a dinner date with the hubby or boyfriend....litterally you can wear this anywhere!!!
Put your hair in a low pony tail to the side and then loosen it. Once you have loosened the "tail" you then flip the pony tail towards your head and flip it. Pull tight and that is all!!!! If you need more assitance please refer to the video I have posted below! Good luck! Remember, always be Simply Stylish!.....
Hairstyle # 30
This will work on medium to long hair! If you can get a pony tail you should be able to achieve this look!
"Tucked In"
You will need a brush and a hair tie, some hairspray,and a comb to complete this style!
This look is so easy and simple. First you need to make a bun. Put it up sort of high. A little above your ears should do. After the bun is in place loosen top as if your were going to do a topsy tail. Do you remember those? A little red contraption. You are going to push your bun forward into the part you have made and shuv it down into the rest of your hair. You can do this style in just minutes. Just have fun with this look. Its different, fun, and elegant.